I've been very impressed with the HeroMachine 3 items DBlade and Zyp have recently submitted. Adding them to the program was much quicker than I thought it would be, and they look good on the figures. And of course, Mark has a long history of drawing a ton of fantastic stuff to flesh out our characters.
For those wanting to submit items, I wanted to put together template files that have everything in the proper layers. That should make it easier for you, and definitely will make it easier for me. After the jump, I'll get into the nitty-gritty details of how to do all this.
This is for advanced users who have access to and are comfortable using a vector-based drawing program, so be warned. If that's not you, then you probably don't need to read further as it's pretty technical.
First, the files I discuss can be downloaded here. It's a ZIP archive, so you'll need some way to uncompress it, which pretty much comes built in to most modern operating systems. The archive contains three files. The first is a Flash CS3 file that contains all the item placeholders and the default male and female template bodies as guide layers at the bottom. The other two files are flattened EPS versions of the male and female bodies in case you prefer to work in some other vector format.
And note that any item submissions must be in vector format, either EPS or Illustrator or (best of all) Flash CS3! Getting a bitmap drawing doesn't do me much good, as I then have to re-draw it anyway.
I'm going to give instructions for the absolutely ideal way (from my perspective) to get submissions. But if all of this is too much work or hassle or too confusing, then just ignore it and draw your item wherever and however you like. I can break it up into objects and name them and whatnot so long as it's clear what's lineart, what's color1, and what's color2. If you're feeling adventurous, though, here's the Grade A Gold Star Perfection Method.
Each HeroMachine 3 item consists of three distinct objects, corresponding to the parts you can color. There's the black line art, the big primary color1 area, and the (generally) smaller secondary color2 area. If you open the Flash file in the Template archive I mentioned earlier, you can see the four ItemRight items broken down into their parts in the Library menu:
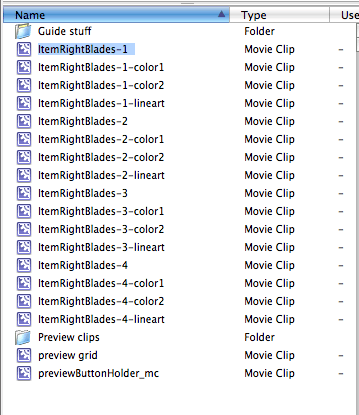
The highlighted object in the screen capture is the placeholder for the first item in the ItemRight slot, in the Blades set. This is a placeholder object containing the three color objects, and is what actually gets placed onto the character. For organizational purposes, I name all the items as "[slot name][set name]-[item number]", and each of the color areas as "[slot name][set name]-[item number]-[colorAreaName]" as you can see.
There are thus four items in this screen capture, each of which consists of four objects (the placeholder and the three color areas).
So if you want to create your own custom item in Flash, here's what you'd do.
First, open the Flash file. You'll see what looks like just a hand floating in space -- that's the Character Template, and you'll need to double-click that to get into the meat of the objects. When you do, you'll see a long list of layers in the Timeline, one for each slot, along with a frame (so you know what'll show on the screen) and two figure templates at the bottom:
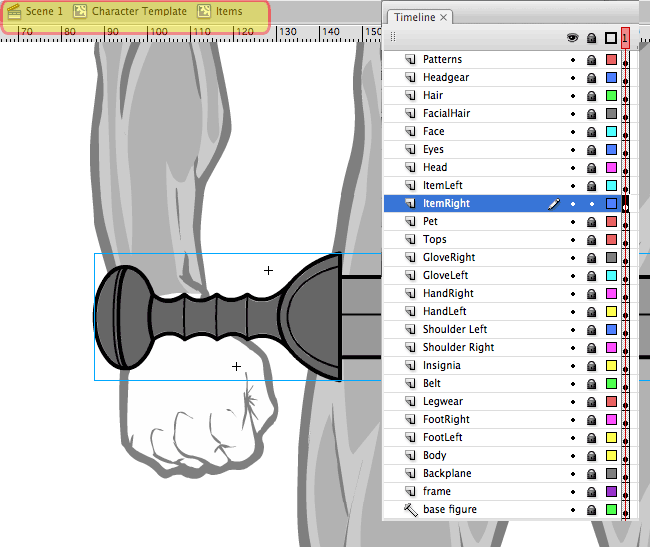
Unlock the slot layer you want to work on (ItemRight in this example). Double-click on the little movie clip holder that appears, or else click on the appropriate frame and go to Edit-Edit in Place. In the highlighted area at the top of the screen grab you can see that you should be in the Character Template clip, then in the "Items" clip (which is what ItemRight is named).
In the Library list, drag one of the existing placeholder objects onto the stage. In the screen capture above, I've dragged ItemRightBlades-1 onto the stage. You don't want to drag one of the color objects over, you want the first, placeholding object.
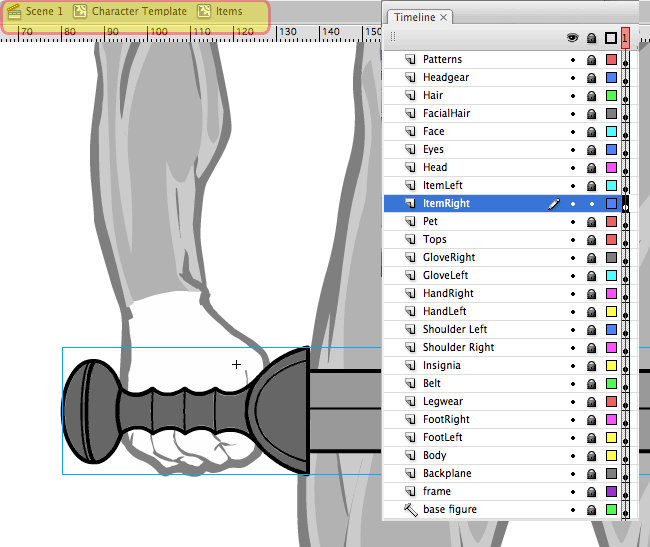
Note that the little "+" that marks the center of the object is not lined up with the "+" of the hand. You want them to match so you know you're drawing the item in the place where it'll appear when the user adds it to the character. So nudge or drag ItemRightBlades-1 around till the two "+" marks align:
Now double-click ItemRightBlades-1. You'll see the layout of the actual objects in the Timeline:
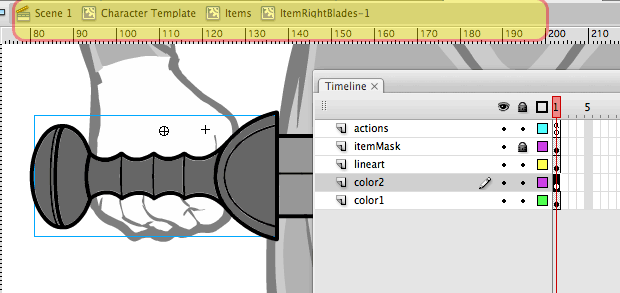
They're all aligned properly so you can cut-and-paste-in-place as you go. You won't need to worry about the actions or itemMask layers. Now you're ready to draw!
I start by hiding the color2 and color1 layers. Then I double-click on the lineart layer:
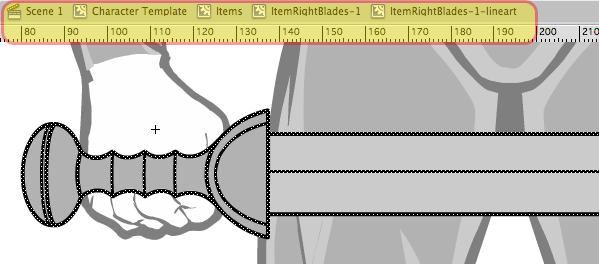
Delete what's there already and start your drawing. When the line art is how you want it, copy it all and go back one level to ItemRightBlades-1. Unhide the color1 layer and edit the object there. Paste in place the line art and fill it all with a light gray, so everything's the same color. This is also the object that serves as the pattern mask -- anything filled here will be where patterns show when or if applied.
I almost always have color1 be a fill of the entire object, it's just easier that way.
When you're done with that, unhide color2 and edit the object there. Paste in place your black line art again, and fill in the bits you want to be color2 with a darker gray than you used in color1.
That's it!
If you want to make more than one object, the easiest way is to place a previous object in the right place. Duplicate it, renaming it to the next number up (so from ItemRightBlades-1 to ItemRightBlades-2, for instance). Open it and rename the itemMask, color1, color2, and lineArt objects to match the new item name (so from itemRightBlades-1-color1 to itemRightBlades-2-color1 for instance). Note that the itemMask and color1 objects are the same, so after you duplicate one of those you can use Swap Item on the other. Hopefully that makes sense.
And remember, if all of that's too much work or hassle, then just ignore it and draw your item wherever you like. I can break it up into objects and name them and whatnot so long as it's clear what's lineart, what's color1, and what's color2.

